Disclosure: Some links may be affiliate links. This means that I may earn a small commission if you decide to buy (at no additional cost to you)
Last Updated on March 18, 2026 by Erin Donahue
Not to scare you, but I’ve never been more stressed packing for a trip than when I was packing for the Camino de Santiago. I travel a lot, so normally I can throw everything together in under an hour because I’ve got a system. But this was different. Every packing choice had to be intentional.
Here’s what made it into the rucksack for my pilgrimage on the Camino Inglés.
How Heavy Should Your Backpack be for the Camino Inglés?
When hiking the Camino, the rule of thumb is not to carry more than 10% of your body weight, because your rucksack will start to feel like a boulder when you’re walking fifteen miles (or more) a day. It’s a loose rule, and 20% is more realistic. A lot of the packing advice you’ll find online assumes you’re willing to spend hundreds on ultralight gear. When doing your research, take this with a grain of salt. If you’re not trying to buy a whole new wardrobe just to go hiking, it can come across as pretty elitist.
When I was packing, I had a hard time deciding what to cut, and it got to a point where I was literally weighing each piece of clothing on a food scale. In the end, my pack came in at about 10kg — almost 22 lbs all in, not including water. I was so worried about how sluggish I’d feel that I did something I told myself I absolutely wasn’t going to do.
What Backpack Should You Use for the Camino de Santiago?
Choosing the right bag is completely subjective based on someone’s physical ability and preferences. When deciding on the right bag for you, the single most important thing to look for is a hip belt and chest belt. These distribute the weight away from your shoulders and onto your hips, which makes an enormous difference, especially after fatiguing 15 miles.
Initially, I was planning to use my Osprey Fairview 40L, which has been sitting in my closet since 2019, when I went to Lapland chasing the Northern Lights for the first time. This bag is better suited for backpacking around in the traditional sense, without the strenuous physical activity. Back then, I somehow crammed a week’s worth of winter gear into it.
For the Camino, the outfit you wear to the airport doesn’t count towards your pack weight, but the Fairview alone already weighs 3.4 pounds, which left me with less than 10 pounds for my stuff, not including water.
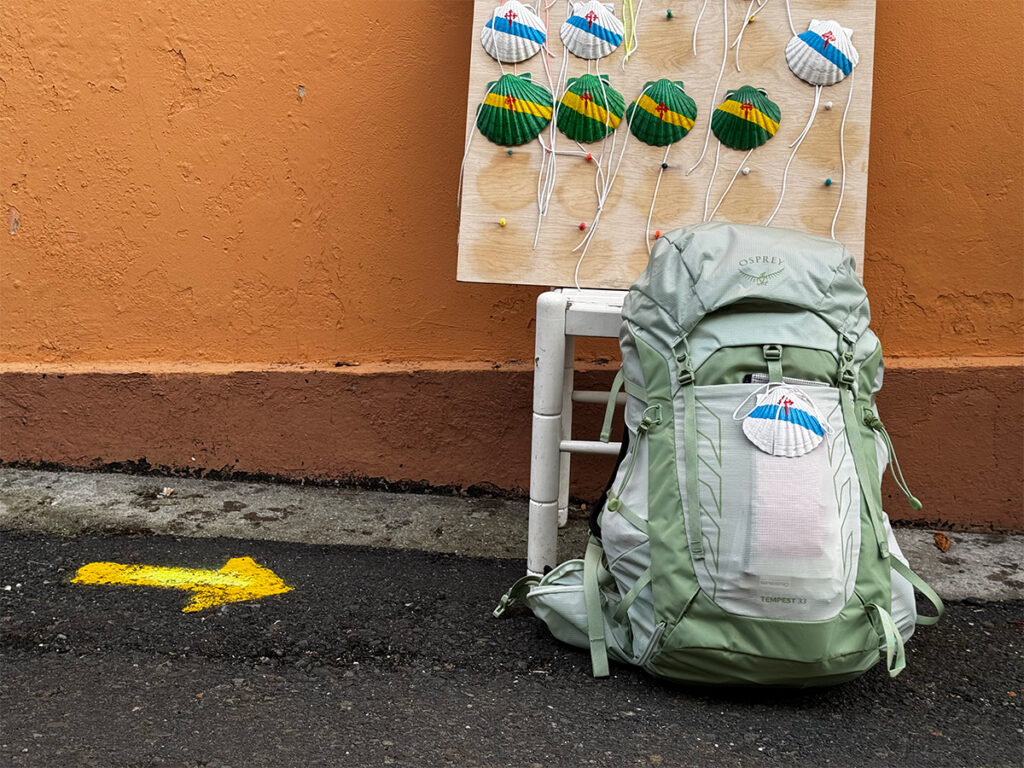
Osprey Tempest 33L
At the last minute, I panic bought the Osprey Tempest 33L to bring instead. Unlike the Fairview, which opens horizontally like a duffel bag, the Tempest is a vertical opening backpack. For me, this is much better suited for hiking. It’s also designed for short torsos, which works perfectly for my frame. It’s smaller, lighter, and it forced me to cut things down even further. Buying a new backpack was exactly what I didn’t want to do, but it was the right call. I ended up selling the Fairview within a week, and that covered a good chunk of the cost of the Tempest. These backpacks move quickly on secondhand sites.
Review of the Osprey Tempest 33L
The AirScape backpanel keeps the bag upright when you’re carrying it, which I like. The only tradeoff is that it’s a hard panel, so storing it flat when it’s not in use is a bit awkward. The internal hydration sleeve fits a 2L CamelBak bladder, which I used throughout the trek. The top-load access felt counterintuitive at first. I worried the bag would become top-heavy, but it ended up being a great setup. I kept the items I reached for most frequently right at the top, so I wasn’t unpacking everything every time I stopped.
My main critique of the bag: the hipbelt pockets are too small to fit a phone.
Factors to consider when choosing a backpack for the Camino de Santiago
- Empty weight under 2.5 lbs
- Hip belt placement
- Fits as a carry-on for flights
- Amount of pockets
Should You Use a Luggage Courier Service on the Camino?
Like choosing the right bag, this comes down to personal preference. A courier service transfers your main bag between towns so you only carry a daypack. Costs are low per transfer, and a lot of pilgrims use it. I deliberately chose not to in order to challenge myself to have an authentic pilgrimage experience.
On top of that, I wasn’t pre-booking accommodation. Not booking in advance gave me the freedom to stop wherever I wanted, but it also meant I had to keep all my stuff with me at all times. If my pack were too heavy, I’d be stuck hauling the consequences every single mile. If you’re pre-booking accommodation or you’re managing a physical injury, a courier service makes complete sense. However, if carrying everything yourself is part of what you’re trying to prove, it’s completely doable with the right setup.
What Footwear to Wear for the Camino
I’m telling you now, it’s definitely NOT hiking boots. You will regret it! In an environment like Galicia, where it’s constantly raining, you want your shoes to be able to dry quickly. Hiking boots aren’t breathable and are heavy. The majority of pilgrimages occur during the summer months, and if you’re wearing a boot with all its material up to your ankles, your feet will be prone to blisters and get unbearably hot. The same goes for waterproof sneakers. They’re great in theory, but if any liquid gets inside the shoe, then you have a problem. A shoe that stays wet is miserable enough on its own, but in a shared albergue, it’s gag-inducing. Ask me how I know. The only exception is if you’re walking in winter, where a boot gives you extra ankle support to avoid slipping in the cooler temps.
Before I bought anything, I went to a running shoe store in NYC to get my feet properly evaluated. As a former distance runner, I know all about needing the proper shoe, but I never actually got confirmation on what type of foot I have. Back when I used to run, this kind of technology was brand new, and the training wasn’t there. A rep at a different store had guessed I had high arches when I didn’t. This time was completely different. The rep was knowledgeable, the data was comprehensive, and you even get a copy of your report emailed to you afterward. Turns out I don’t have any pronation or supination — I just strike the ground heel first, which I’d always suspected since the backs of my sneakers are always the first to wear out. Since I have a neutral gait, all I needed was a neutral shoe.
How to Choose the Right Shoe for the Camino
One thing worth understanding before you shop: tread and traction are not the same thing. Tread refers to the pattern on the sole of the shoe, and traction refers to the shoe’s ability to grip the surface underneath. The two work together, but knowing the difference helps you understand what you’re actually buying.
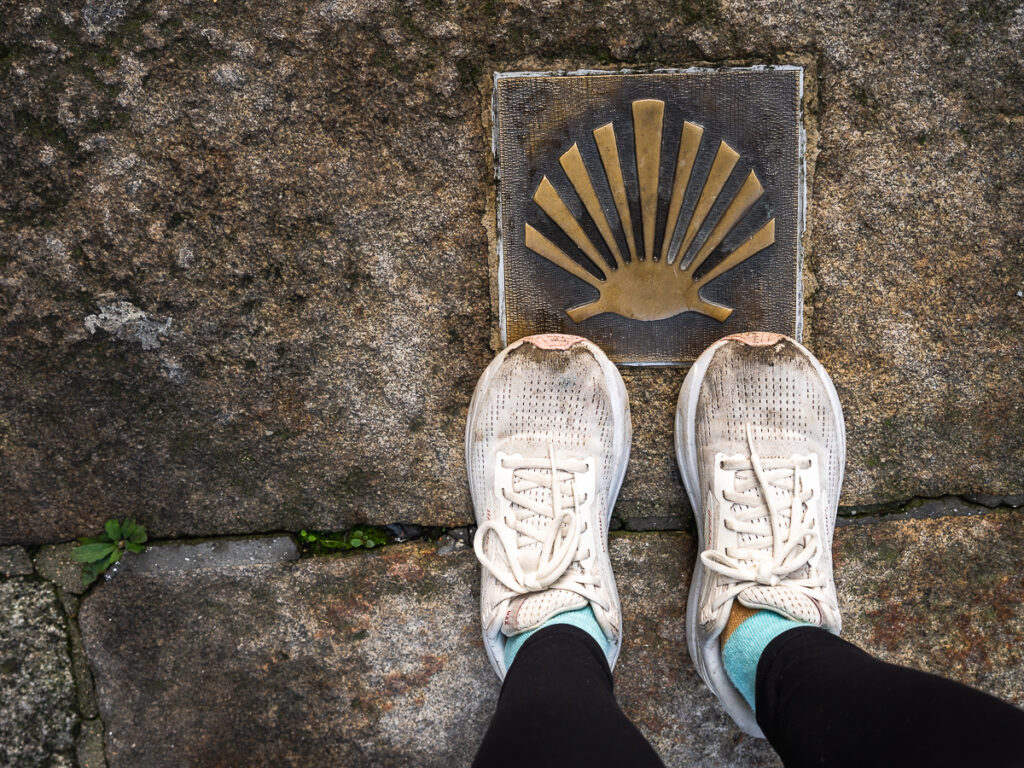
After trying on a few options, I went with the Brooks Ghost Max 2. It’s more of a walking shoe built for city surfaces. At the time, I didn’t take tread into account until after I’d already broken them in. It ended up being fine for the Camino Inglés because the route is well-maintained. The terrain across any of the Camino routes changes constantly, though. For a route with more varied terrain, you’d want something with more grip. If I were choosing again, I’d go with a trail running shoe with more tread, like the Hoka Speedgoat or the Brooks Cascadia.
Whatever shoe you end up with, break them in before you leave! Train in them, wear them on your daily errands, and get them on your feet as much as possible for at least a month before your start date. So many people show up with a fresh pair because they want to feel ready for the journey — but unbroken shoes are a recipe for blisters, and blisters can ruin a Camino experience faster than anything else.
Do You Need Hiking Poles for the Camino Inglés?

While researching what to pack, it seemed like many people brought hiking poles. Frankly, it came across to me as more of an aesthetic thing than a functional one for the younger crowd. I didn’t bring them, and I had a pretty good reason to feel confident about that — the year before my Camino, I walked 32 miles around the perimeter of Manhattan without poles. Although for that one, I probably should have, because I destroyed my hip.
Budget was also a factor, and after reading that poles can’t be brought as carry-on items on planes, I didn’t want the hassle of being separated from my bag. If you’re set on bringing them, a popular workaround is picking up a pair at an outdoor store like Decathlon once you’re in Spain.
That said, if you’re older, have knee issues, or are carrying a heavier pack, poles significantly reduce impact load and are absolutely worth it. If you’re undecided, you can buy a set in Ferrol or A Coruña and sell or donate them in Santiago once your journey is over — many pilgrims do exactly that.
What To Pack for the Camino Inglés in the Fall
What Clothes to Pack
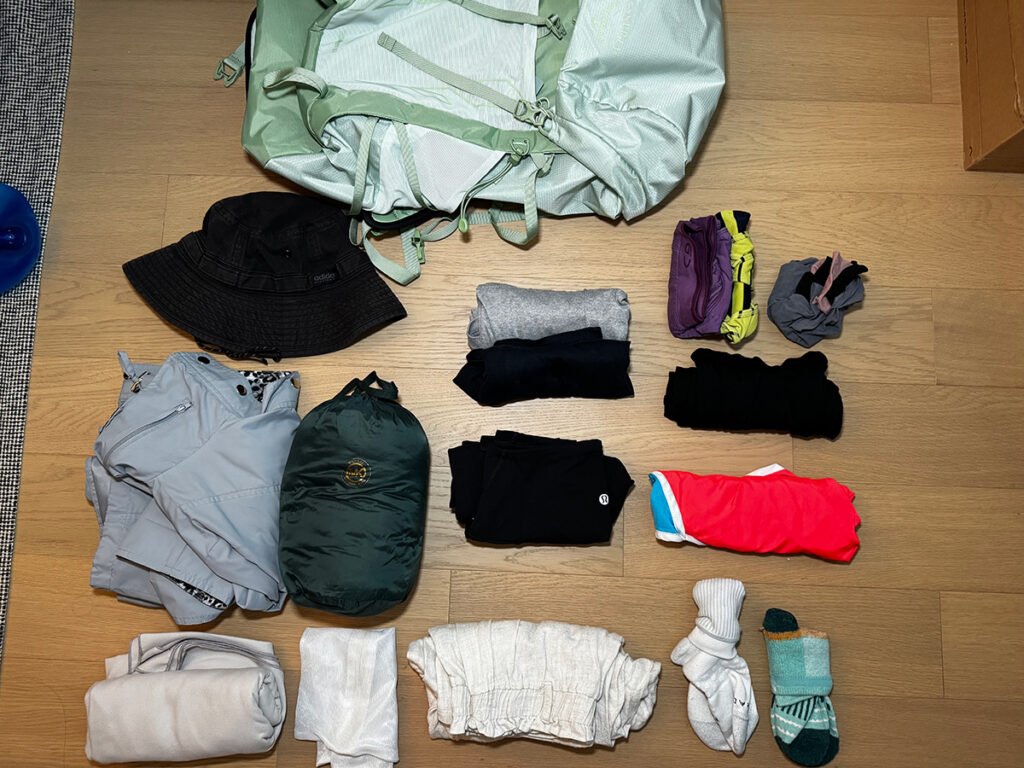
Pack for two days of rotation and wash as you go. Every accommodation has a sink, and some albergues have a washing machine. Otherwise, there are laundromats in town. Materials like merino wool and synthetic fabrics dry overnight, so you’re never waiting too long to have clean clothes again. Something to consider when packing: if you can’t wash it and wear it again the next day, question whether it’s worth bringing.
I walked in September, which sits in that sweet spot where it’s still warm but you can feel the cool creeping in — especially on humid, rainy days. The rain itself was warm, thankfully. For layers, both moisture management and warmth are the priorities. You’ll want a base layer for when it’s cool, a midlayer you can shed, and a shell. Beyond your hiking clothes, bring something comfortable to change into at the end of the day — after walking for miles on end, all you want is to be out of your activewear.
Waterproofing Your Gear
Waterproof does not mean waterproof. Gore-Tex and DWR coatings wear off over time. A jacket that was waterproof a few seasons ago may now just be water-resistant-ish, or even not at all. If you haven’t re-treated your gear recently with a solution like Nikwax, make sure to do it before you go.
Toiletries and Personal Care
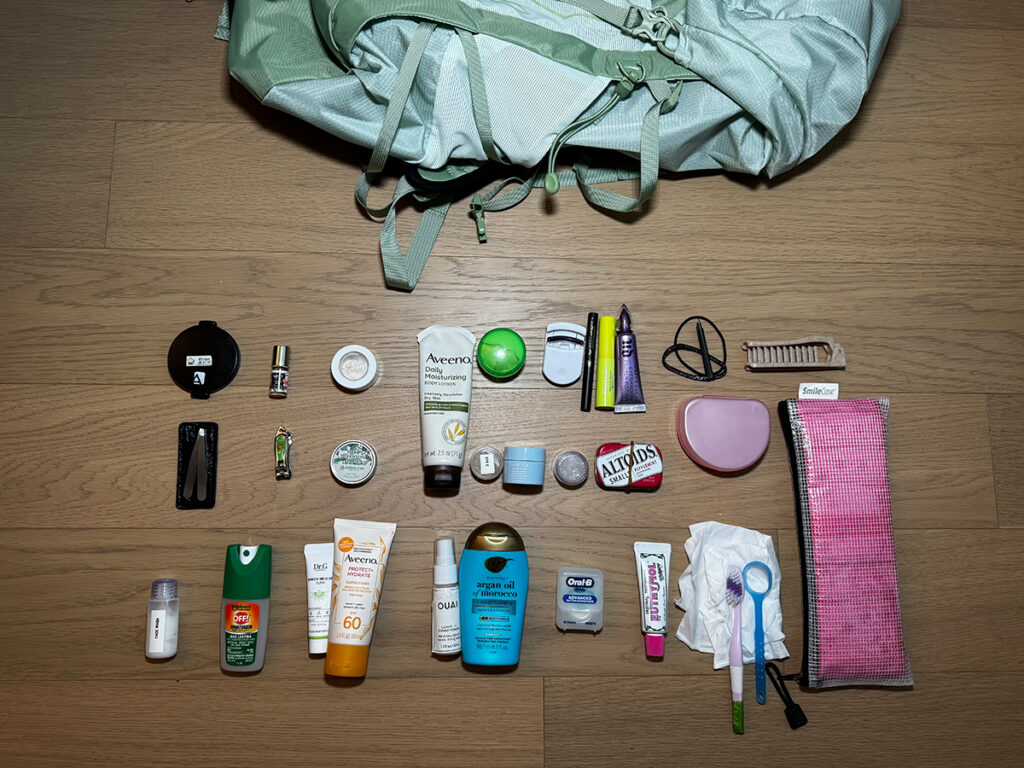
Travel sizes and solid formats wherever possible — liquids are dead weight. Come prepared and don’t rely on accommodations to have the basics. The goal is finding the balance between having enough and not overdoing it. If you’re walking one of the longer routes, you’ll likely need to restock along the way. Sunscreen is non-negotiable. You’re outside for hours at a time, every single day. Same with a basic first aid setup and something for blisters if they appear.
The Camino has a way of clarifying what actually matters. That said, I did bring some makeup with me. Purists might scoff, but I was also spending time in London, A Coruña, Santiago de Compostela, and Madrid before and after my Camino. On the days I wasn’t walking, I wanted to spruce up.
Electronics
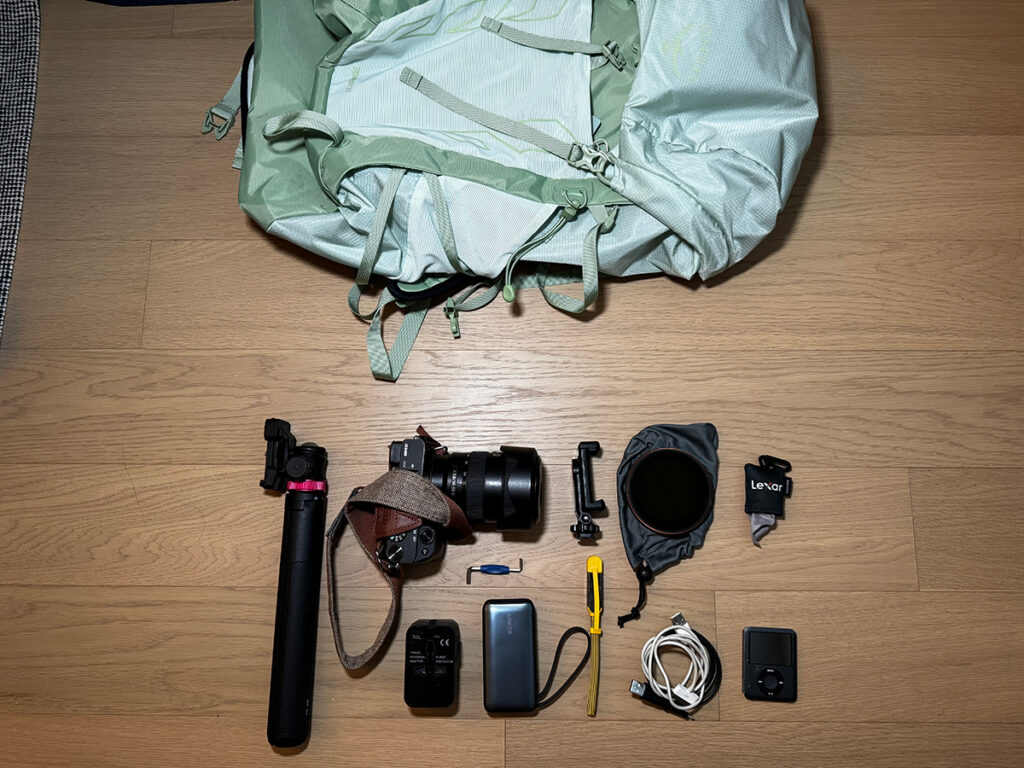
Assuming you’re an American reading this, a universal travel adapter with a converter is a must. Beyond that, your phone handles most of what you need — navigation, camera, journaling, translation. I also brought a portable power bank since I’d be away from outlets for most of the day.
One item I brought that’s completely optional but was a non-negotiable for me was a camera. I’m a photographer, and I wanted the depth of field only a camera could provide. I brought my Sony a6400 with the 16-55mm f/2.8 G lens. It’s an APS-C setup, which is lighter than a full-frame, but it still added well over a pound that I either could’ve used on other things or simply left behind.
What Snacks to Pack for the Camino Inglés
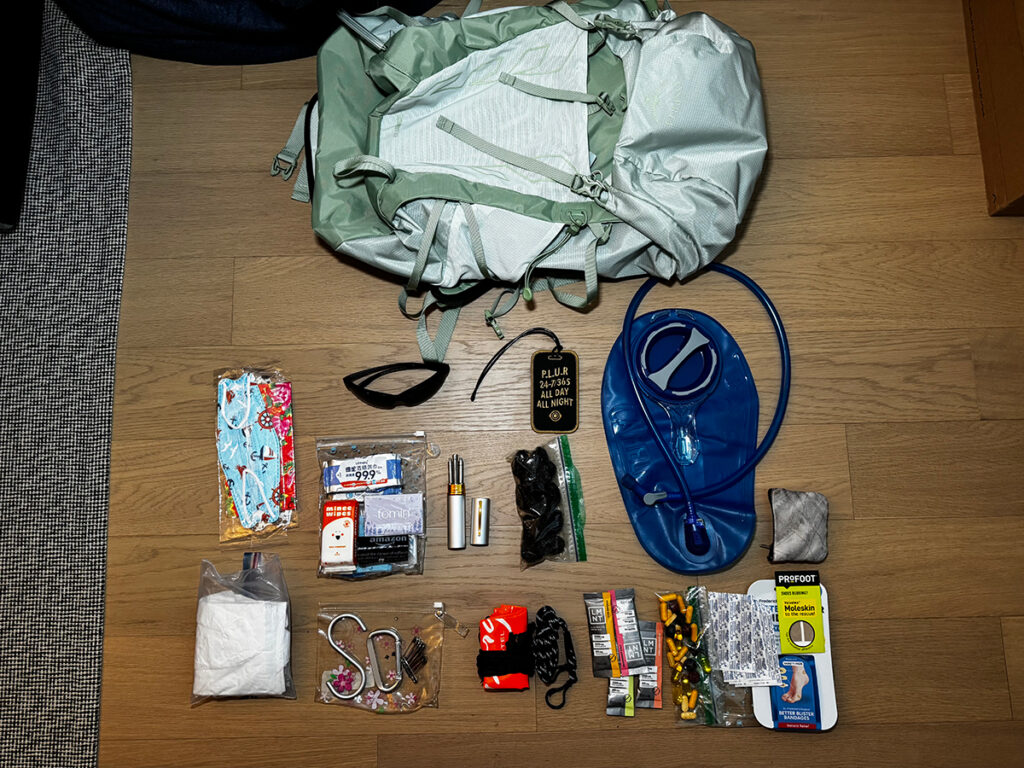
A bonus item I brought that probably no one else has: prunes. They are my holy grail! I bring them on every trip, and the Camino was no exception. They’re low-calorie, low-fat, and they keep your digestion and bowel regularity in check. Anyone who travels knows that something about being away from home just messes that routine up. That being said, I had to be strategic about timing. Since I didn’t start my hikes until noon after breakfast, one of my fears was pooping on the side of the road where there was no toilet. So I saved them for after I arrived at my accommodation for the night.
Download My Complete Camino Inglés Packing List
In the end, I did the Camino with just that 33L backpack. I didn’t use a courier service at any point. Didn’t buy hiking poles. It was just me and my bag! Knowing I could manage everything myself made the journey feel far more authentic and lighter than I ever expected. If you want the exact packing list I used for the Camino, subscribe to receive the free PDF!
Protect Your Trip to Spain With Travel Insurance
Before you book your Camino de Santiago Trip, protect yourself against flight delays, lost luggage, and medical emergencies. You can purchase it even after your trip has started! I use SafetyWing for all my European travel because it covers:
- flight delays and cancellations
- Lost or delayed luggage
- Medical emergencies abroad
- Adventure activities coverage
FAQs About Camino Inglés Packing List
How much should my Camino pack weigh?
Aim for no more than 10% of your body weight, including water. Weigh your empty bag first because it eats into that budget faster than you expect.
What size backpack do I need for the Camino Inglés?
A 30–35L backpack is a manageable range without a courier service. Anything larger encourages overpacking. Anything under 28L gets difficult unless you’re very experienced with ultralight packing.
What shoes are best for the Camino Inglés?
Trail runners work best for most walkers because they’re lighter, dry faster, and handle mixed terrain comfortably. Whatever you choose, break them in completely before your trip.
Do you need rain gear for the Camino Inglés?
Galicia is one of Spain’s wettest regions, so a waterproof shell is essential. Treat it before your trip because waterproof coatings wear down faster than most people realize.
Do you need a courier transfer service on the Camino Inglés?
Many walkers carry their own bags comfortably if they pack light. That said, luggage transfer services are very common on the Camino Inglés. They cost about €5–8 per stage and work well if you’re pre-booking stays, want to walk lighter, or have an injury.
Comments +